“Remote” Bare Metal Foundation

One of the little known options when using “Bare Metal” Foundation is doing so over a layer 3 network, instead of the traditional “same layer 2 network + MAC address” method.

This allows Foundation imaging of Nutanix nodes over a (good!) WAN link or across different subnets in your DC for example.

Foundation-SiteA-SiteB

This method can be used to remotely ‘Bare Metal’ any hardware vendor platform running Nutanix via IPv4 – Nutanix NX, Lenovo HX, Dell XC, Software Only Cisco and HPE and others.

Foundation-Remote-Quote
Quick Summary of the “Remote Bare Metal Foundation” procedure:

  1. Rack and cable the nodes, and configure the IPMI ports on the network with an IPv4 address (eg. via BIOS see below). Do this first. 
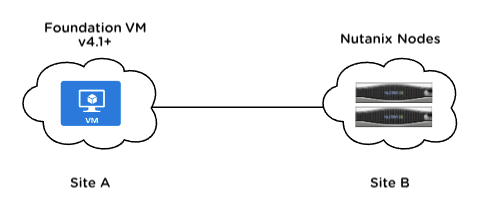
  2. Deploy the Foundation VM on the network – ensuring it has IPv4 connectivity to the IPMI ports. The VM does not need to be on the same subnet as the IPMI ports and could be in a different site over a WAN.
  3. Go through the Bare Metal install process via the Foundation VM, skipping discovery and instead manually adding blocks/nodes via selecting the “I have configured their IPMIs to my desired IP addresses” option.

Critical Note on WAN Bandwidth Requirements

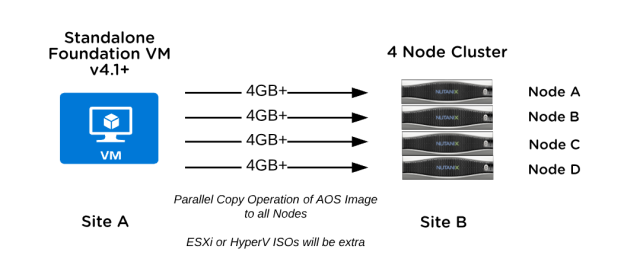
With this method you will copy AOS + Hypervisor image files over the network in parallel to each and every node – so consider available bandwidth and network utilisation as well as the AOS / Hypervisor image sizes that will be transferred from your Foundation VM to the nodes during the imaging process.

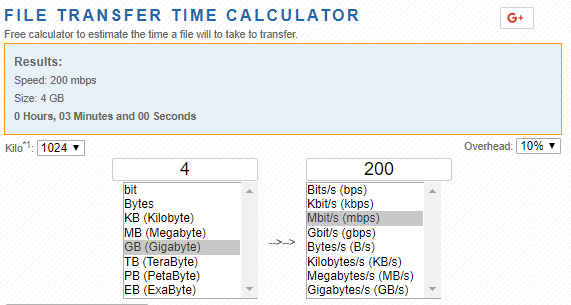
These files can be several GB in size. Foundation pushing images to nodes will time out after 15 minutes – so you will likely need a WAN link minimum of 50Mbit/s to copy the 4GB AOS file to a SINGLE node…and a better link if you are changing to ESXi (additional ~350MB) or HyperV (additional ~4GB) or if you are imaging more than one node.

If you have 4 nodes – multiply that by 4 of course. Clearly, this method is not for your small branch ROBO link. Use a tool like https://techinternets.com/copy_calc to see if your WAN link can handle the workload within that timeframe.

At time of writing you cannot modify the timeout setting.

Foundation-FileXfer-WAN2


In summary, ensure your network link is capable of respecting the timeout value taking into account the number of nodes you are imaging. For example, if you were imaging 4 nodes over the WAN, you will be copying at least 16GB in total over that link within 15 minutes.

Screenshot 2018-05-23 09.46.39

If you had a 1Gbit link (or local 1 Gbit switch), 20 nodes would take ~12 minutes just for the AOS images. If you are imaging HyperV nodes, you could only image 10 nodes (as you need to include the 4GB HyperV ISO as well) on 1Gbit links. This is why old 100Mbit switches or USB adapters won’t suffice when you are imaging multiple nodes. 

Site A and Site B can be different L3 subnets. Make sure Site A’s Foundation VM subnet and Site B’s IPMI subnet and Site B’s CVM/Hypervisor subnet are all routable to each other. That is, every subnet involved must be routable to each other.

Setting the IPMI Ports Manually

If you are unsure how to set the IPMI IP addresses manually, see “Setting IPMI Static IP Address” section in the Foundation Field Installation Guide for instructions for configuring via BIOS on each node.  The Foundation Field Installation Guide can be found on the Nutanix Support Portal.

Foundation-BIOS-IPMI

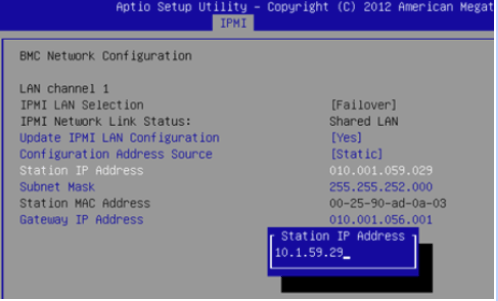
The above screenshot is from one node’s IPMI settings via BIOS. You would repeat this for each and every node you want to deploy, then use Foundation to image the nodes.

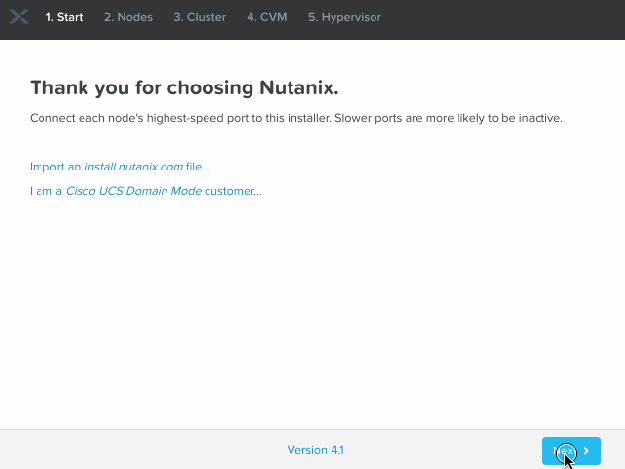
Quick UI Walkthrough

Below is a walkthrough of the initial screens in Foundation v4.1 for the Bare Metal via IPv4 process. Note that the IPMI addresses you type should match the IP addresses you’ve manually assigned to the nodes of course  :

FNDN-41-ipv4IPMI

We are also developing a “Foundation Central” microservice within Prism Central which will allow for ‘zero touch’ deployments at scale, including using a local (to the nodes) file store to avoid pushing files over the WAN – but for now this ‘bare metal’ method works if you have the luxury of bandwidth.

Intro to Nutanix Lifecycle Manager (LCM) v1.2

“Single Pane of Glass” gets thrown around a lot by vendors …. as does “upgrades are easy”. If you lucky enough to be a Nutanix customer, you already live this dream. 

But how could the Nutanix Engineering team make the experience even better?

While Hugh was using the tried-and-true traditional Nutanix AOS upgrade method within Nutanix Prism, each individual component (such as AOS, hypervisor, BIOS etc) had to be done independently. It was reliable of course, but what if you wanted to upgrade many components of your cluster at once and it be just as easy and reliable and to take care of the dependencies for you?

Plus, with security releases coming thick and fast these days, it is imperative that we try to make it dead simple for customers like Hugh to be able to react quickly to patch their infrastructure, regardless of hypervisor or hardware component type.

Thus, Nutanix Life Cycle Manager (LCM) was born.

LCM-menu.PNG

The LCM feature is available with Nutanix AOS 5.0+

LCM is a framework that can detect and upgrade hardware and software components in a rolling fashion completely in-band via Nutanix Prism, taking care of any dependencies and maintenance mode operations as needed to conduct the upgrades.

The idea is that you can go to the one location to manage all your Nutanix related software and firmware updates, click a button and then LCM will orchestrate the entire process, with no effect on your running workloads. All this while you go and do something else in the meantime, or perhaps just have a quiet glass of red.

LCM has the power to tell whatever brand of hypervisor you are using to evacuate VMs to other nodes and reboot the host should the update require it. Only when a host is confirmed that it has returned to service is the next host able to conduct it’s upgrade.

LCM is intelligent enough to allow you to select one node only for some updates. For example, you might want to just upgrade the BIOS or disks firmware in one node. Some updates are cluster wide and some can be node based depending on the component – but in either case LCM will take care of the operation for you.

If you are not familiar with Nutanix LCM, then take a look at the quick video demos :


LCM is the framework which (eventually) will be the method in which you manage updates and upgrades to your Nutanix clusters. I say ‘eventually’ because it is still early days for LCM, but things are ramping up quickly. As such, you should check for new LCM updates every week and see which new features are unlocked with the latest LCM Framework updates.

You don’t have to wait for a new version of the Nutanix AOS software either – LCM is independent of AOS – so you can upgrade LCM at any time a new update is available.

So what’s new in LCM v1.2?

With v1.2, LCM supports additional inventory and update components on Nutanix NX and Dell XC clusters. Lenovo HX and Nutanix Software-Only support is under development.  Up to now, only the SATADOM updates were supported.

The following has been added in LCM v1.2:

Nutanix NX and SX Platform LCM support requires AHV or ESXi 5.5, 6.0, or 6.5 and supports updates to the following components : HDD, SSD and NVMe drives. 

Dell XC Platform LCM support requires ESXi 5.5 and 6.0 and AOS 5.1.0.3 or newer and supports updates to the following XC components: XC BIOS, XC iDRAC, XC HBA controller, XC NIC, XC Disks (SSD and HDD). 

For more details, check the release notes on the Nutanix Support Portal.

Using LCM

If you’ve not had a look at LCM before, I suggest you update the LCM Framework to the latest version, run an ‘Inventory’ (discovery) job and take a look around.

It is a good idea to run a ‘Perform Inventory’ operation first. This will scan your cluster and check if there are any updates available for any components, including the LCM Framework itself.

lcm-perfinv.PNG

Go to the LCM page and select Options->Perform Inventory.  The status will change to “Perform Inventory in Progress” which takes a few minutes as your whole cluster is scanned.

lcm-perfinv-in-progress.PNG
You may see some available updates:

lcm-availupdate2.PNG

You can see that the above screenshot shows software and some hardware components that have available updates. In order to update LCM to the latest, I’ll select (and update) the ‘Cluster Software Component’ and hit the ‘Update Selected’ button.


lcm-availupdate3-sure.PNG
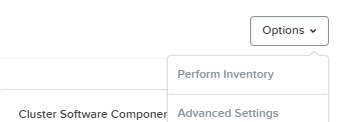
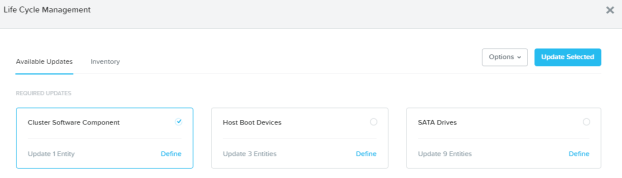
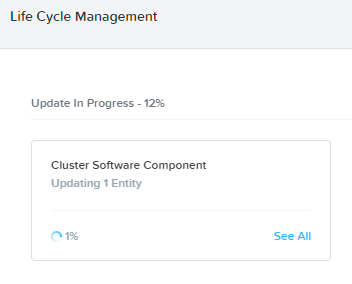
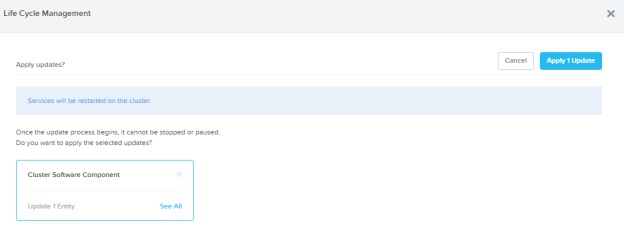
Run that update. You will see a message that “Services will be restarted” – meaning the Nutanix internal services will restart (LCM related) – but this is a non disruptive operation to your workloads so it is safe to run this update anytime. Once you hit the “Apply 1 Update” button,  update process starts.


lcm-update-in-progress.PNG

Once the new update to LCM is installed, run Perform Inventory again to see if there are any new updates or components supported in the new version (now that you’ve updated the LCM Framework, there may be some more unlocked features).

If there are any other updates available, you may choose to update them as well using the same logic.

Future Plans

In the coming months you will see more unlocked updates appear in LCM, including broader hypervisor support, more hardware component support, more Nutanix software support (eg. NCC, Foundation etc) so that the current “Upgrade Software” menu will eventually be retired and LCM takes over all functions related to our “1-Click Upgrades”.

LCM in Prism Central will also launch in 2018, with the ability to expand LCM to handle upgrades across multiple clusters.

In the meantime, the LCM Engineering team would love to hear your suggestions and feedback. They also love twitter mentions, so please keep them coming.


Nutanix Foundation 3.7

Here are some of the improvements in Nutanix Foundation 3.7 which was released on Feb 27, 2017.

Reorder of Blocks via Drag n Drop 

You can now reorder blocks so that they are in the desired positions whilst keeping the IP addressing sequence intact. This is especially useful for large deployments.

Screen Shot 2017-02-27 at 4.28.53 PM.png

Clicking ‘Reorder Blocks’ will show a drag n drop popup

A demo video illustrating the effects of reordering blocks (thanks YJ for the video):

IP Sequencing

Instead of automatic increments of IP addresses by 1, you can use a ‘+’ operand to create the sequence you desire. See below for an example.

Screen Shot 2017-02-27 at 4.33.40 PM.png

Using +2 to auto fill every 2nd IP address in the sequence

Timezone support

You can now optionally select the timezone for your cluster at the Global Configuration page.

Screenshot 2017-03-02 10.27.46.png

Timezone support

Image Selection Page Improvements

The Image Selection Page no longer forces you to upload a new images and instead use the ones already on the detected nodes.  You can also add/delete ISOs from the UI.

Screen Shot 2017-02-27 at 4.39.45 PM.png

Image Selection Page Redesigned

Updating Foundation from UI

You can now use the UI to upload a Foundation tarball and update Foundation itself when new versions are available. It is highly recommended to always use the latest version, so it is easier to update. You can get the latest release notes and Foundation files from the Nutanix Support Portal.

Screen Shot 2017-02-27 at 4.41.43 PM.png

screen-shot-2017-02-27-at-4-42-10-pm

Summary

This is a great release by the Foundation Engineering team at Nutanix with over 70 bug fixes and improvements such as the above included. There are several exciting features coming in future releases (approximately every month) so always check the Nutanix Support Portal for the latest updates. If there is a feature you’d like so see, feel free to contact me.