Tag Archives: install

Nutanix Deployment Delight with “Zero-Touch” Foundation Central

With remote working now the new normal, it is challenging to send skilled IT professionals to data centers to install new equipment. Although Nutanix clusters have always been quick to install and configure, there was still a requirement to send a trained IT technician to site to run the Foundation software for deployment, usually connected to a local laptop. For large-scale or multiple sites, this can be a costly exercise.

How could we make this even easier in a ‘work from home’ world? 

With the launch of Nutanix Foundation Central 1.0 with Prism Central 5.17, this specialist requirement is now removed. 

Zero-touch deployments are now a reality for factory-shipped appliances from Nutanix, Lenovo, HPE, Dell, Fujitsu, and Inspur…. all will be Foundation Central ready out of the box. 

fc-blog-1

Nutanix Foundation Central is a service on Prism Central 5.17+

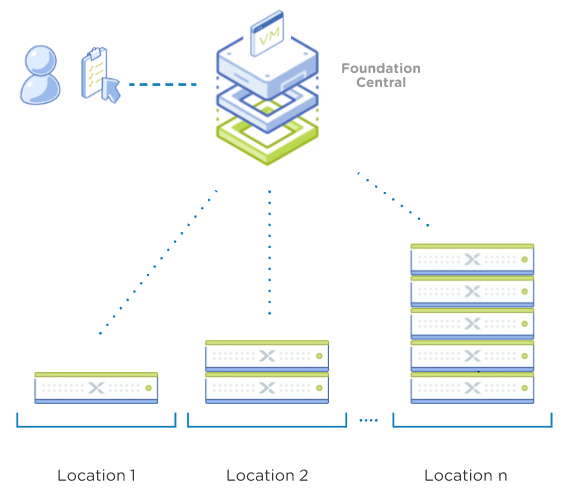
Foundation Central (FC) is an at-scale orchestrator of Nutanix deployment and imaging operations. After the initial network prerequisites are met, new nodes ordered from the factory can be connected to the network and receive Foundation Central’s IP address via DHCP assignment. Since nodes are shipping from the factory, they will have either a functional CVM (running the CVM Foundation service) or DiscoveryOS (for NX International shipments) inbuilt.  

The nodes (no matter the location) send their “I’m ready” heartbeat status to Foundation Central. 

“Location” can be within the same Data Center and/or a remote site as an example. 

Once the nodes are detected by Foundation Central, the administrator can create a deployment task and then send that task to the locations and the configuration job is conducted by the nodes themselves. The nodes send their job status back to Foundation Central for the administrator to monitor. 

fc-8node-01home

Foundation Central Home Screen with 15 discovered nodes. Nodes can be running different AOS and/or Hypervisor and can be re-deployed into clusters with a new AOS/Hypervisor of choice

Foundation Central never initiates a connection to the nodes. The nodes are the source for all communications and are awaiting to receive their orders on what task to do. 

fc-blog-2

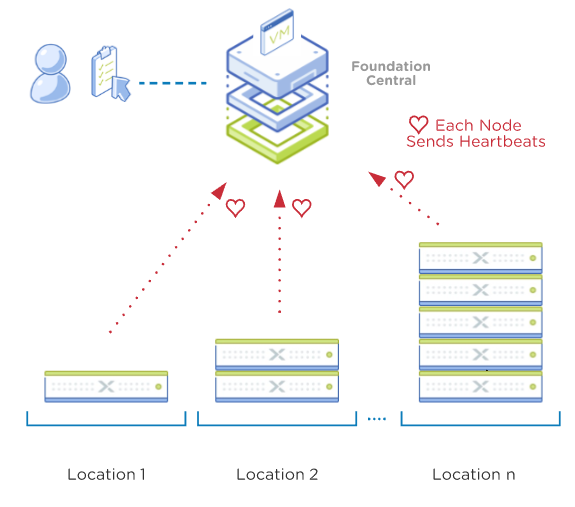
Unconfigured nodes send heartbeats to Foundation Central

Foundation Central receives these node heartbeats and then will display the nodes as available to be configured. By default this could take up to 20 minutes to appear in the Foundation Central UI. Heartbeats are sent until the nodes are configured and part of a formed cluster. 

fc-blog-3

Unconfigured nodes send requests to FC and receive their configuration orders

Foundation Central is only receiving status updates until job completion. It receives these status updates from the coordinating node.

After a successful configuration/re-imaging process is done on one node, the original ‘coordinating node’ hands over to that new 100% completed node, and now this node takes over as the new (permanent) coordinating node for the remaining nodes.

If re-imaging to a different AOS or Hypervisor is required, Foundation Central will ask for the URL where these images can be found. These can be anywhere on the network, but given the file size it is recommended they be local to the nodes where possible. 

fc-blog-8

Changing AOS and Hypervisor Type if required

Once the administrator configures the Foundation Central jobs as desired, Foundation Central will await the specified nodes to request their configuration task. 

fc-blog-4

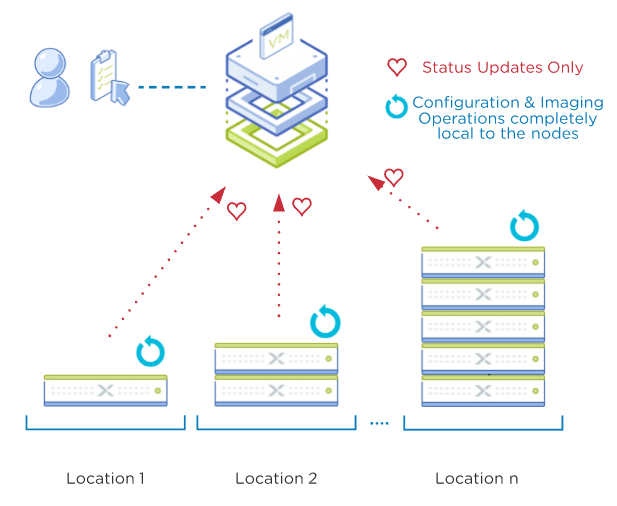
Imaging and Configuration tasks are always local to the nodes/location

Configuration tasks are then fully handed off to the local nodes and Foundation Central becomes a ‘passive partner’ in the process from here. The nodes elect a ‘coordinating node’ for the entire operation and will be responsible for keeping Foundation Central updated on the status of the tasks.

fc-blog-9

Deployment Complete in parallel with different AOS/Hypervisors no matter the location


Foundation Central Requirements 

  • Nodes must be running Foundation 4.5.1 or higher (bundled with a CVM or DiscoveryOS). It is advisable to run the latest Foundation on the nodes
    (upgrade using APIs is very easy before imaging) 
  • Networking requirements must be met (see below)
  • Prism Central must be minimum version 5.17  

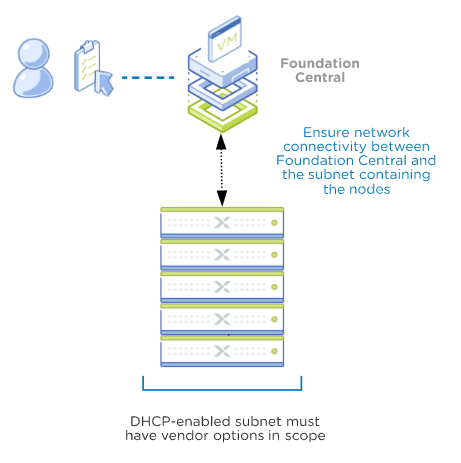
Networking and DHCP Requirements to use Foundation Central

The factory nodes need to be connected to a network that has a DHCP scope defined which allows for specific DHCP options. This is to ensure the nodes automatically receive the Foundation Central IP address and API keys specific to your environment. 

  • DHCP server must be present and must be configured with vendor-specific-options:
    Vendor class: NutanixFC
    Vendor encapsulated options (DHCP option 43):

    • Option code: 200, Option name: fc_ip
    • Option code: 201, Option name: api_key
  • L3 connectivity from remote nodes to Foundation Central must be available 
  • L3 connectivity between ‘starting’ and ‘destination’ subnets if IP addresses are to be changed as part of the node configuration process
  • Remote CVMs must be configured in DHCP mode (default from factory) 
fc-blog-6

Option 1: Nodes are discovered and configured to remain in the same subnet

The factory nodes need to be connected to a network that has a DHCP scope defined which allows for specific DHCP options. This is to ensure the nodes automatically receive the Foundation Central IP address and API keys specific to your environment. 

fc-blog-5

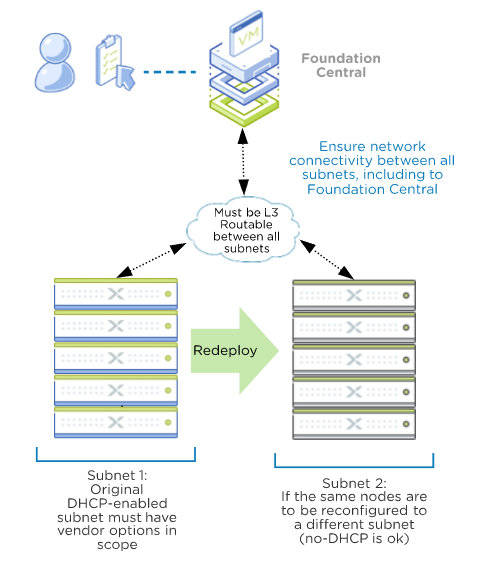
Option 2: Nodes will be re-deployed to a different subnet. DHCP is not required for the 2nd subnet.

For more information contact your Nutanix SE or check the Foundation Central Guide on the Nutanix Support portal.

Special thanks to Foundation Engineering (Toms, Monica, Toshik, YJ and extended team) for the development of Foundation Central…they are already working on some improvements for v1.1 !

Please reach out with any feedback or suggestions and I trust this helps in making your working-from-home life a little easier.

Basic configuration of the Nutanix 2RU block

Winter is coming for the old SANThought I’d describe what you get when the shiny new 2RU Nutanix block gets to your door and how to get it configured to a basic level from the point of view as a new user of the Nutanix solution. Obviously, talk to your Nutanix partner before diving in, but this should give you a bit more of an idea on what you need to do to prepare.

In my case the block was comprised of four nodes and I ordered it with 192 GB RAM per node (768 GB total). I won’t go into the tech specs in detail as you can get that from their web site : http://www.nutanix.com/products.html#Specs

The rail kit is a snap-on type, easy to install, but don’t be a goose (like I was) and try to lift/install it into your rack by yourself. It isn’t light as the disks are pre-installed. After a short trip to the emergency room I continued with the config… :)

The next thing I did was send an email to Nutanix support to get registered as a customer when then allows you access to the knowledge base. Within about 10 minutes I had a reply and login to their support portal.  I searched for ‘setup’ and got the setup guide. If you aren’t sure what version to get, contact support – they are very fast to respond. In my case it was v2.6.2 (latest for Oct 2012).

Physical cabling was easy: 2 power cables (carve off to separate UPS power feeds); Each node has 1 x 10GigE network interface and 2 x 1 GigE interfaces for failover of the 10GigE as well one IPMI (lights out management) 1 GigE interface. That’s it. I assigned the IPMI as access ports and the 10Gig and 1Gig uplink-to-network ports as trunks.

The guide itself is pretty straight forward and easy to follow and the easiest method is to use IPv6 to configure the cluster. I used a Win7 laptop with IPv6 enabled, Bonjour for Windows, Google Chrome (with DNSSD extension) and your typical dumb gigabit switch to hook it all up in an isolated environment initially (if you want to isolate it). The cluster uses the 1 gig interfaces as a failover to the 10 gig nics, so that’s why it works on a basic 1 GigE switch. The setup process assigns IPv4 addresses to the cluster components so don’t worry about needing to be an IPv6 guru – you don’t. You don’t have to use Win7, other OS options are ok too. I didn’t try any other OS/browser combo so YMMV.

In my case I’ve assigned a complete /24 subnet in the DC for Nutanix infrastructure. It is recommended that all the components are in the same L2 domain but it is not mandatory. Addresses will be split out between the ESXi hosts, IPMI adapters and Nutanix controller virtual machines. Do not use 192.168.5.x/24 as this is reserved for the cluster’s internal communication.

I reserved addresses in segments so that when I get more Nutanix blocks, the expansion is contiguous. You don’t have to follow my example of course, but here it is:

Block/ Node ID  ESXi host   Controller VM    IPMI interface
Block 1 Node A     10.1.1.21     10.1.1.121          10.1.1.201
Block 1 Node B     10.1.1.22     10.1.1.122          10.1.1.202
Block 1 Node C     10.1.1.23     10.1.1.123          10.1.1.203
Block 1 Node D     10.1.1.24     10.1.1.124          10.1.1.204

As you can see, any future blocks can continue the sequence. eg:

Block 2 Node A     10.1.1.25     10.1.1.125          10.1.1.205  … and so on for any future nodes.

I don’t think I’ll ever have 54 nodes so that sequencing should be ok :) The controller virtual machine is where all the magic happens. There is one of these per node and the key to the whole Nutanix solution is the software and processes that run within the Controller vm; keeping everything in check and optimised; even in the event of failure.

The block ships with evaluation versions of vSphere ESXi hypervisor, vCenter server, Windows 2008 R2 Enterprise (for vCenter), MS SQL 2008 Enterprise (for the vCenter database). You can apply your own licenses as appropriate. Each host has its own local datastore (stored on the SATA SSD) and the distributed NFS datastore is comprised of the FusionIO drive (PCIe SSD) and the SATA disks. There are also ‘diagnostic’ vm’s pre-deployed which are used to benchmark the performance of the cluster.

You do not have to use the vCenter and you can decide to use your pre-existing one (it will save you a license). At this stage I’ll probably keep a separate vCenter for the VDI deployment but that is up to your own individual deployment scenario.

Once the cluster is ‘up’ you can then follow the guide and configure NTP and DNS from the CLI, configure the vMA, configure the cluster and hosts in vCenter, install the VAAI plugin and the NFS storage.

I also added an external non-Nutanix NFS datastore to all ESXi hosts so that I could use it as a transfer mechanism to get vm’s and templates from existing vSphere infrastructure to the Nutanix block should I want to. Note that there is a way to allow external-to-Nutanix ESXi hosts to connect to the internal Nutanix NFS datastore, however I think it is easier and better to keep the only hosts that can write to the Nutanix NFS datastore as the Nutanix nodes themselves.

When you take into account picking up the box from the loading dock, unpacking, lifting/racking, cabling, getting your Win7 laptop ready, cluster and vSphere configuration, DC network configuration, moving from isolated to production, installing the VAAI plugin, configuring NFS storage and final checks I’d say you were looking at a few hours in total to complete. Obviously adding any more blocks will take significantly less time given most of the clustering components are already done.

The ease of configuration and administration of the Nutanix block has been great. The other thing to keep in mind is that the support team from Nutanix (and their partners) can assist you with the above deployment process if you like.

So, at the end, you have a complete storage and compute modular building block that is easy to deploy and scale out when you require. In the coming weeks I’ll provide updates on the experience on using the block for our VDI project, as well as going into some detail on how the block has been designed from the ground up to handle a lot of different failure scenarios.

Be sure to check out some of the Nutanix YouTube videos as well if you haven’t done so: http://www.youtube.com/user/Nutanix and get ready for a life without a SAN in your DC.

The Nutanix box arrives in Australia