
One of the reasons people stay with a particular type of hypervisor is that it is too hard (or too costly) to migrate to another type. All that drama of converting, testing and making sure all is right and then the risk of having to move back if something went wrong.
Sure, there are separate software tools you can buy to do the conversion for you . . . but what if the virtualisation infrastructure itself – the thing that is actually providing your servers and storage – could do it as an in-built function? What if that could be done just by clicking a few buttons?
So in the demo video below, I take a running Windows VM on a Nutanix Cluster “A” running vSphere and then take a snapshot of it and send it to a second Nutanix Cluster “B” running Nutanix’s own free Hypervisor (AHV) and then start the VM. Job done. Easy.
Here’s the setup:
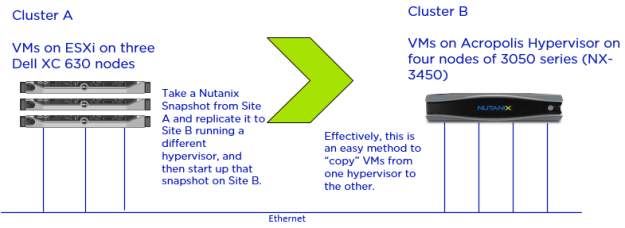
Basic lab setup using a flat L2 network. Production and DR deployments would use L3 networks – which is fine of course
..and here’s the demo:
For brevity, I cut out the initial one-off processes to set up the Replication. The full process was below (check out the Nutanix Index for articles describing setting up Replication):
1. Setup a Data Protection Remote Site ‘pair’ of clusters (so that they can replicate to each other) and test the connection.
Site A (ESXi cluster)
Site B (AHV cluster)
2. Set up a Protection Domain policy, add the VM you want to be a part of the replication policy and set a schedule.
3. On the Windows VM on ESXi on site A that you want to snap to Site B running AHV, make sure you install the Nutanix VM Mobility drivers MSI from the my.nutanix.com support portal. (These will soon be included in Nutanix Guest Tools (NGT) post Nutanix AOS 4.6 release, so by installing the NGT you will automatically get the VM Mobility drivers). The Nutanix VM Mobility installer deploys the drivers that are required at the destination AHV cluster. After you prepare the source VMs, they can be exported (snapped) to the AHV cluster.
4. Run the snapshot and restore operation as per the video. That’s it!

Almost as easy as clicking this button
A few points to note:
In the video I am just taking a crash-consistent snapshot, if you want a clean snap then shut down the source VM first, then snap, then restore. Live app-consistent snapshots will be coming in 4.6 for ESXi and AHV.
Obviously if your VMs have static IPs or to avoid computer naming issues, you should take care of these before joining the newly created AHV VM to the network. When you restore the VM on AHV, by default there is no virtual nic connected (so the risk is minimal if you just want to test). If you wanted it to connect to the network you would attach a nic to the restored VM on via Prism on the AHV cluster (go to the VM page).
Only 64-bit guest operating systems are supported at the time of writing (Nutanix AOS 4.5).
For Windows 7 and Windows 2008 R2 operating systems, you have to install SHA-2 code signing support patch before installing Nutanix VM Mobility installer. For more information, see https://technet.microsoft.com/en-us/library/security/3033929.
More info can be found in the Nutanix Prism Web Console Guide under the “Nutanix VM Mobility for Windows” section – which can be found on the Nutanix Support Portal.
Use cases:
A lot of people are trying AHV for the first time, and larger customers usually have a test/dev set of Nutanix nodes for testing. This method would be perfect to try snapping production VMs on AHV for testing and verify all is OK.
Also, I can see a use case where DR clusters could now use the in-built AHV on Nutanix clusters and save some licensing dollars.
It would also be possible to use Nutanix Community Edition as the AHV target – in case you had some spare hardware and wanted to just try this out without the need for a full Nutanix set of nodes.
Future software plans:
In a few weeks (early 2016), Nutanix will release AOS 4.6. With it, two-way VM conversion (ESXi<->AHV in either direction) should be included. In a future release AOS is expected to add support for Hyper-V, delta disks, and volume groups.
Yes, Nutanix will enable the ability to leave AHV and migrate your VMs *back* to ESXi (for example) should you choose. Put simply, the onus is on Nutanix to keep innovating to maintain your loyalty, rather than any technical or license ‘lock-in’. At the end of the day your workloads are just virtual machines – you should be free to move them wherever you see fit (even away from Nutanix if you choose).
There will be lots of improvement and extra features coming in future releases of course, which you will get by simply doing a standard Nutanix non-disruptive upgrade.
Conclusion:
In essence, you can see why going Hyper-converged makes doing things like this almost trivial compared trying to do the same in a traditional 3-tier infrastructure (separate servers and storage layers). As the Nutanix software improves, your life gets easier each time. With each Nutanix release, more and more features like this will continue to be added and improved. Being 100% in-software is going to be a necessity in the next decade and beyond.
Thanks to @danmoz for letting me borrow his Dell XC cluster… and I treated it badly too (eg. multiple times I hard powered it off with no care – and it self-recovered every time).

Hypervisor lock-in is sooo 2007 :)

