Upgrading CVM Foundation via API

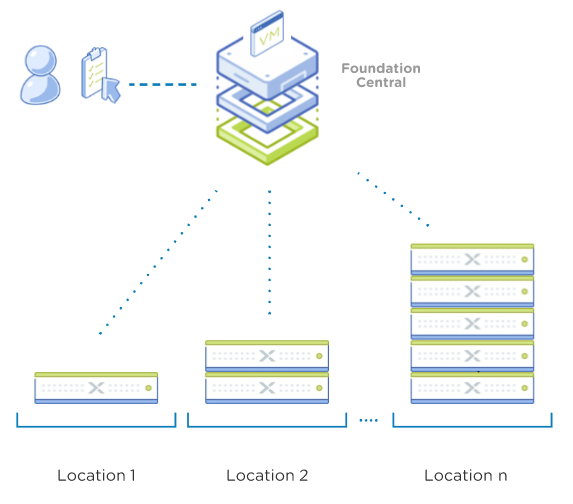
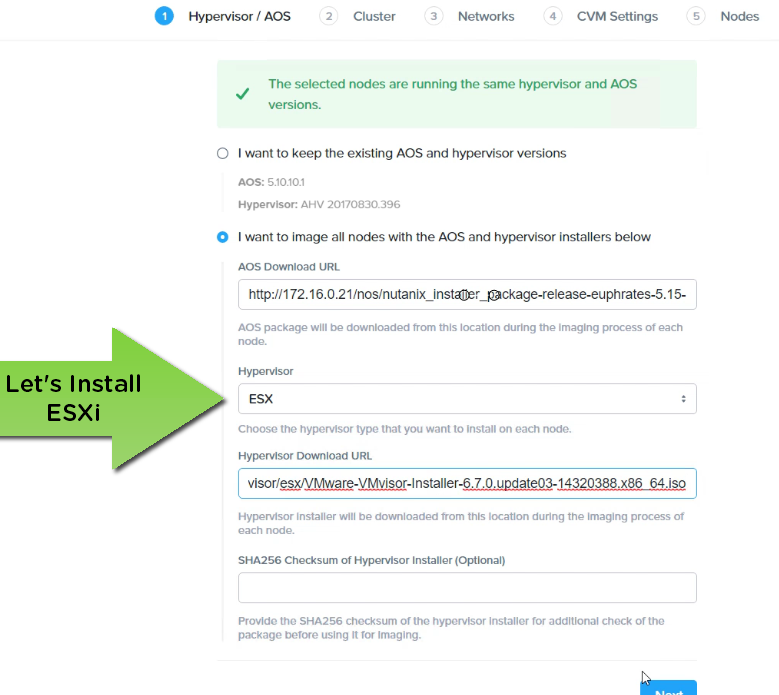
Unconfigured Nodes can easily be upgraded

Following on from the Foundation Central introduction, the nodes should be running Foundation 4.5.1+ as minimum. There could be a scenario where the Foundation version in the CVM is older, given that the factories ship software that may be a few months behind the latest versions.

How can you get Foundation on the nodes up to a newer version before imaging?

Fortunately, upgrading is easy via the API which can be accessed via the CLI or a browser and I’ll cover both methods below.

Part 1: The CVMs have Internet access

CLI Method with Internet Access

If the CVMs have internet access the latest available update on the Nutanix Portal will be auto installed when the API is called. Here we are starting with a node with Foundation 4.4.3 installed and we want to update it to the latest available (4.5.3 at the time of writing).

To determine the current version on the node:

nutanix@NTNX-B-CVM:~$ cat foundation/foundation_version
Foundation-4.4.3-abc86afd

Or use the API to get the current version:

nutanix@NTNX-B-CVM:~$  curl -X GET --header "Accept: application/json" "http://172.16.9.57:8000/foundation/version" ; echo ""
4.4.3

Execute the API call to upgrade Foundation:

nutanix@NTNX-B-CVM:~$ curl -X GET --header "Accept: application/json" "http://172.16.9.57:8000/foundation/auto_update_foundation"

That’s all there is to it. Now just wait ~2 to 15 minutes depending on your connection speed to the Nutanix Portal for the binary (~1.6GB) to download and install, then verify:

nutanix@NTNX-B-CVM:~$cat foundation/foundation_version
foundation-4.5.3-815d6c96

Done!

GUI Method with Internet Access  

  1. Navigate to a CVM via http://your-cvm-ip:8000/docs
    If a node (unconfigured) has DHCP and has registered with Foundation Central you can determine the IP address of the CVMs from the Foundation Central home page
  2. You can check if an Foundation update for the CVM is available using this API :  /is_update_available
    Find that on the API Explorer page, expand it and click “Try it out!” button
  3. Verify you get Response Code 200 after being patient (~10 to 30 seconds)
  4. If a Foundation upgrade is available, you can now upgrade. Upgrade the CVMs Foundation to the latest version using this API :  /auto_update_foundation and again expand it and click “Try it out!” 

Same as before it can take several minutes depending on your connection to the Nutanix Portal. Verify you get a Response Code 200.

If the CVMs have internet access, you don’t need to provide any parameters to these APIs, all you have to do is to hit “Try it out!” on that screen. Find the /version API on the Explorer page after the upgrade to verify the latest version is now on the node. 

Done!

Part 2: If the CVMs have no direct Internet access

If the nodes cannot contact the Nutanix Portal directly, you will need the foundation upgrade binary from the Nutanix Portal and apply the update manually.

For example, upgrading from v4.4.3 to v4.5.3 using a manual file:   

  1. Get the “Foundation Upgrade for CVM or Standalone Foundation VM” file from the Nutanix Portal (eg. foundation-4.5.3.tar.gz
  2. Create a directory on the CVM you want to be upgraded : /home/nutanix/foundation_updates
  3. Copy the foundation-<version>.tar.gz file to this location

CLI method via manual update file 

Now that we have the binary uploaded, we can initiate the upgrade.

nutanix@NTNX-B-CVM:~$ cat foundation/foundation_version
foundation-4.4.3-abc86afd

nutanix@NTNX-B-CVM:~$$ ls ~/foundation_updates/
foundation-4.5.3.tar.gz

nutanix@NTNX-B-CVM:~$ curl -X GET --header "Accept: application/json" "http://172.16.9.58:8000/foundation/auto_update_foundation?tar_file=foundation-4.5.3.tar.gz"

<wait ~1-2 minutes>

nutanix@NTNX-B-CVM:~$cat foundation/foundation_version
foundation-4.5.3-815d6c96

Once complete, remember to delete the file you uploaded to /home/nutanix/foundation_updates to conserve CVM space.

Done !

GUI method via manual update file  

  1. Navigate to the CVM via http://your-cvm-ip:8000/docs and the API Explorer will appear. Expand the /auto_update_foundation section. 
  2. Make the API call via the /auto_update_foundation and add the filename uploaded and click “Try it out!”.
  3. Foundation will be upgraded after a few minutes. Verify by either querying the API  /version or via the CVM:  ‘cat ~foundation/foundation_version’
  4. Done!

Once complete, remember to delete the file you uploaded to /home/nutanix/foundation_updates to conserve CVM space.

Browsing to the update Foundation API via the Explorer on http://cvm_ip:8000/docs

We plan to incorporate upgrading CVM Foundation on nodes detected by Foundation Central soon, so you can centrally update all your nodes easily.

Nutanix Deployment Delight with “Zero-Touch” Foundation Central

With remote working now the new normal, it is challenging to send skilled IT professionals to data centers to install new equipment. Although Nutanix clusters have always been quick to install and configure, there was still a requirement to send a trained IT technician to site to run the Foundation software for deployment, usually connected to a local laptop. For large-scale or multiple sites, this can be a costly exercise.

How could we make this even easier in a ‘work from home’ world? 

With the launch of Nutanix Foundation Central 1.0 with Prism Central 5.17, this specialist requirement is now removed. 

Zero-touch deployments are now a reality for factory-shipped appliances from Nutanix, Lenovo, HPE, Dell, Fujitsu, and Inspur…. all will be Foundation Central ready out of the box. 

fc-blog-1

Nutanix Foundation Central is a service on Prism Central 5.17+

Foundation Central (FC) is an at-scale orchestrator of Nutanix deployment and imaging operations. After the initial network prerequisites are met, new nodes ordered from the factory can be connected to the network and receive Foundation Central’s IP address via DHCP assignment. Since nodes are shipping from the factory, they will have either a functional CVM (running the CVM Foundation service) or DiscoveryOS (for NX International shipments) inbuilt.  

The nodes (no matter the location) send their “I’m ready” heartbeat status to Foundation Central. 

“Location” can be within the same Data Center and/or a remote site as an example. 

Once the nodes are detected by Foundation Central, the administrator can create a deployment task and then send that task to the locations and the configuration job is conducted by the nodes themselves. The nodes send their job status back to Foundation Central for the administrator to monitor. 

fc-8node-01home

Foundation Central Home Screen with 15 discovered nodes. Nodes can be running different AOS and/or Hypervisor and can be re-deployed into clusters with a new AOS/Hypervisor of choice

Foundation Central never initiates a connection to the nodes. The nodes are the source for all communications and are awaiting to receive their orders on what task to do. 

fc-blog-2

Unconfigured nodes send heartbeats to Foundation Central

Foundation Central receives these node heartbeats and then will display the nodes as available to be configured. By default this could take up to 20 minutes to appear in the Foundation Central UI. Heartbeats are sent until the nodes are configured and part of a formed cluster. 

fc-blog-3

Unconfigured nodes send requests to FC and receive their configuration orders

Foundation Central is only receiving status updates until job completion. It receives these status updates from the coordinating node.

After a successful configuration/re-imaging process is done on one node, the original ‘coordinating node’ hands over to that new 100% completed node, and now this node takes over as the new (permanent) coordinating node for the remaining nodes.

If re-imaging to a different AOS or Hypervisor is required, Foundation Central will ask for the URL where these images can be found. These can be anywhere on the network, but given the file size it is recommended they be local to the nodes where possible. 

fc-blog-8

Changing AOS and Hypervisor Type if required

Once the administrator configures the Foundation Central jobs as desired, Foundation Central will await the specified nodes to request their configuration task. 

fc-blog-4

Imaging and Configuration tasks are always local to the nodes/location

Configuration tasks are then fully handed off to the local nodes and Foundation Central becomes a ‘passive partner’ in the process from here. The nodes elect a ‘coordinating node’ for the entire operation and will be responsible for keeping Foundation Central updated on the status of the tasks.

fc-blog-9

Deployment Complete in parallel with different AOS/Hypervisors no matter the location


Foundation Central Requirements 

  • Nodes must be running Foundation 4.5.1 or higher (bundled with a CVM or DiscoveryOS). It is advisable to run the latest Foundation on the nodes
    (upgrade using APIs is very easy before imaging) 
  • Networking requirements must be met (see below)
  • Prism Central must be minimum version 5.17  

Networking and DHCP Requirements to use Foundation Central

The factory nodes need to be connected to a network that has a DHCP scope defined which allows for specific DHCP options. This is to ensure the nodes automatically receive the Foundation Central IP address and API keys specific to your environment. 

  • DHCP server must be present and must be configured with vendor-specific-options:
    Vendor class: NutanixFC
    Vendor encapsulated options (DHCP option 43):

    • Option code: 200, Option name: fc_ip
    • Option code: 201, Option name: api_key
  • L3 connectivity from remote nodes to Foundation Central must be available 
  • L3 connectivity between ‘starting’ and ‘destination’ subnets if IP addresses are to be changed as part of the node configuration process
  • Remote CVMs must be configured in DHCP mode (default from factory) 

fc-blog-6

Option 1: Nodes are discovered and configured to remain in the same subnet

The factory nodes need to be connected to a network that has a DHCP scope defined which allows for specific DHCP options. This is to ensure the nodes automatically receive the Foundation Central IP address and API keys specific to your environment. 

fc-blog-5

Option 2: Nodes will be re-deployed to a different subnet. DHCP is not required for the 2nd subnet.

For more information contact your Nutanix SE or check the Foundation Central Guide on the Nutanix Support portal.

Special thanks to Foundation Engineering (Toms, Monica, Toshik, YJ and extended team) for the development of Foundation Central…they are already working on some improvements for v1.1 !

Please reach out with any feedback or suggestions and I trust this helps in making your working-from-home life a little easier.

Nutanix Foundation 4.1

Foundation 4.1 brings a bunch of improvements to make Nutanix deployments even easier.

The Foundation Golden Rule

Always upgrade and use the latest available version of Foundation” prior to your deployments.  Each new version has new features (like the below) as well as additional new platforms and software supported by Nutanix. If you are using an old version you are missing out !

foundationinstallmethod

Foundation Release Notes help determine which method to use

Upgrading is easy. Download the tar.gz from the support portal. In Standalone VM Foundation, click the version number and follow the prompts. In CVM Foundation use the java applet to upgrade the inbuilt Foundation on the discovered nodes.

Let’s get into what is in 4.1.


Foundation UI Changes

CVM Foundation and Standalone VM Foundation in 4.1 have a more unified UI and workflow. However, Standalone Foundation VM is the only method that allows you to manually add nodes (instead of using discovery) or abort an in-progress imaging session.

Range Auto-fill option has been moved to the “Tools” menu to keep the default UI clean.

Screenshot 2018-06-23 14.08.47

Foundation now generates auto-filled host names without a hyphen by default.

CVM Foundation now supports imaging nodes without forming a cluster. This was already supported in Standalone VM Foundation.

Standalone Foundation VM (via discovery) can image nodes or create a cluster without IPMI being required. This mirrors the CVM Foundation experience in Standalone VM Foundation.

Faster Deployments via Skipping AOS Imaging

On discovered nodes, Foundation 4.1 can now skip imaging AOS (if all nodes are the same AOS version) and allow you to just change the underlying hypervisor whilst keeping the AOS version as-is. This saves downloading and re-uploading the AOS image file when the AOS version isn’t changing. This is a time saver.

Lets say your nodes arrive from the factory with AHV and AOS version 5.5.1. You do not need to upload a new AOS image during the Foundation process if you just wanted to change to ESXi for example.

Screenshot 2018-06-24 11.34.22


Screenshot 2018-06-24 11.34.44

As an example, below I selected ESXi 6.5U1 to change the primary hypervisor for the cluster. By default Foundation will image all nodes to ESXi, but in my case I wanted to select nodes C and D to remain on AHV in ‘Storage Only’ or ‘Storage Node’ mode. This way I could have all nodes participate in the storage pool but only need to license ESXi on nodes A and B.

Screenshot 2018-06-24 11.35.55

Once you click “Start” you can relax – it will take about an hour to complete the process. Note that if you aren’t changing AOS or hypervisor images at all, an install takes just a few minutes total (just applying your IP addresses).

41ImagingESXIandAHV

Imaging nodes with different hypervisors (ESXi and AHV for “Storage Nodes”) at the same time !

Side note : of course the AHV nodes finish first! (Though no one is surprised right?! :)

Screenshot 2018-06-24 12.30.57

All done! 

Screenshot 2018-06-24 12.51.55

Pre-Configuration Portal JSON file creation and import

Foundation can import configuration files generated at https://install.nutanix.com. This can be used to generate a Foundation JSON file that can be imported into Foundation 4.1+ on site. You can create a configuration manually ,or if you have placed an order for Nutanix NX nodes, you can see your order and auto-populate the nodes (while the nodes are being shipped for example).

Below are some screenshots from the install.nutanix.com site. The idea is that the UI should look very similar to the normal Foundation process.
EOS1


EOS2.PNG

Note that the “Import New Order” function only applies to Nutanix NX orders. We are investigating ways to expand this to other appliance types in a future release.

Once you’ve completed the fields, click the ‘Download’ link at the bottom of the page to generate your JSON file.

Other Fixes in 4.1:

Multi-homing is supported when IPMI configuration is skipped.

Foundation no longer fails if a NTP server is supplied but not reachable with AOS 5.6+

Summary:

Nutanix Foundation continues to evolve. We’ve got some more UI changes and features planned around better networking options and more central deployment methods, with the eventual goal that anyone would be able to deploy their Nutanix cluster with any hypervisor they choose, any model of node they choose, in any configuration they want and eventually any cloud with just a few clicks, and in an automated fashion.

Would love to hear your suggestions and feedback on Foundation to make it better.