Tag Archives: nutanix

Intro to Nutanix Lifecycle Manager (LCM) v1.2

“Single Pane of Glass” gets thrown around a lot by vendors …. as does “upgrades are easy”. If you lucky enough to be a Nutanix customer, you already live this dream. 

But how could the Nutanix Engineering team make the experience even better?

While Hugh was using the tried-and-true traditional Nutanix AOS upgrade method within Nutanix Prism, each individual component (such as AOS, hypervisor, BIOS etc) had to be done independently. It was reliable of course, but what if you wanted to upgrade many components of your cluster at once and it be just as easy and reliable and to take care of the dependencies for you?

Plus, with security releases coming thick and fast these days, it is imperative that we try to make it dead simple for customers like Hugh to be able to react quickly to patch their infrastructure, regardless of hypervisor or hardware component type.

Thus, Nutanix Life Cycle Manager (LCM) was born.

LCM-menu.PNG

The LCM feature is available with Nutanix AOS 5.0+

LCM is a framework that can detect and upgrade hardware and software components in a rolling fashion completely in-band via Nutanix Prism, taking care of any dependencies and maintenance mode operations as needed to conduct the upgrades.

The idea is that you can go to the one location to manage all your Nutanix related software and firmware updates, click a button and then LCM will orchestrate the entire process, with no effect on your running workloads. All this while you go and do something else in the meantime, or perhaps just have a quiet glass of red.

LCM has the power to tell whatever brand of hypervisor you are using to evacuate VMs to other nodes and reboot the host should the update require it. Only when a host is confirmed that it has returned to service is the next host able to conduct it’s upgrade.

LCM is intelligent enough to allow you to select one node only for some updates. For example, you might want to just upgrade the BIOS or disks firmware in one node. Some updates are cluster wide and some can be node based depending on the component – but in either case LCM will take care of the operation for you.

If you are not familiar with Nutanix LCM, then take a look at the quick video demos :


LCM is the framework which (eventually) will be the method in which you manage updates and upgrades to your Nutanix clusters. I say ‘eventually’ because it is still early days for LCM, but things are ramping up quickly. As such, you should check for new LCM updates every week and see which new features are unlocked with the latest LCM Framework updates.

You don’t have to wait for a new version of the Nutanix AOS software either – LCM is independent of AOS – so you can upgrade LCM at any time a new update is available.

So what’s new in LCM v1.2?

With v1.2, LCM supports additional inventory and update components on Nutanix NX and Dell XC clusters. Lenovo HX and Nutanix Software-Only support is under development.  Up to now, only the SATADOM updates were supported.

The following has been added in LCM v1.2:

Nutanix NX and SX Platform LCM support requires AHV or ESXi 5.5, 6.0, or 6.5 and supports updates to the following components : HDD, SSD and NVMe drives. 

Dell XC Platform LCM support requires ESXi 5.5 and 6.0 and AOS 5.1.0.3 or newer and supports updates to the following XC components: XC BIOS, XC iDRAC, XC HBA controller, XC NIC, XC Disks (SSD and HDD). 

For more details, check the release notes on the Nutanix Support Portal.

Using LCM

If you’ve not had a look at LCM before, I suggest you update the LCM Framework to the latest version, run an ‘Inventory’ (discovery) job and take a look around.

It is a good idea to run a ‘Perform Inventory’ operation first. This will scan your cluster and check if there are any updates available for any components, including the LCM Framework itself.

lcm-perfinv.PNG

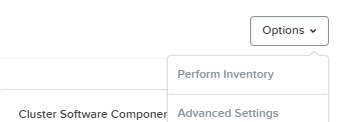
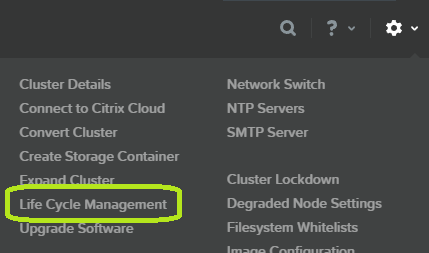
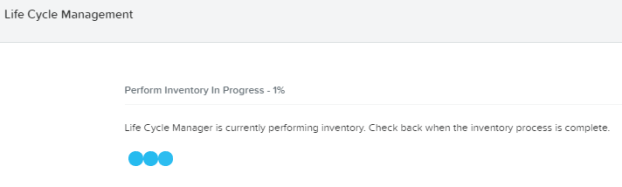
Go to the LCM page and select Options->Perform Inventory.  The status will change to “Perform Inventory in Progress” which takes a few minutes as your whole cluster is scanned.

lcm-perfinv-in-progress.PNG
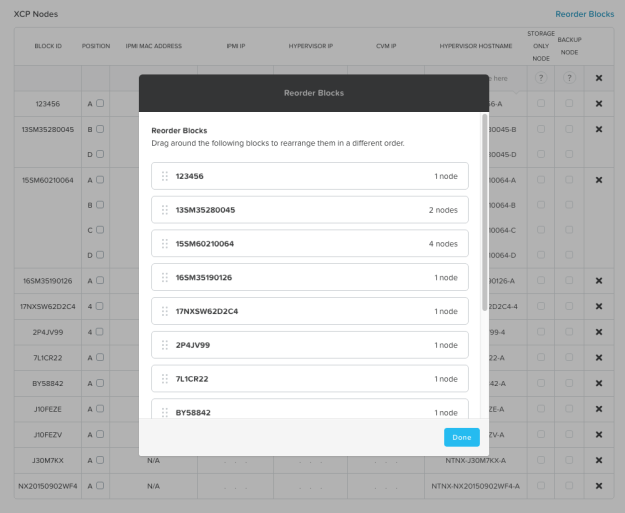
You may see some available updates:

lcm-availupdate2.PNG

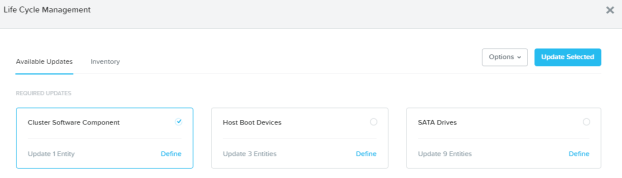
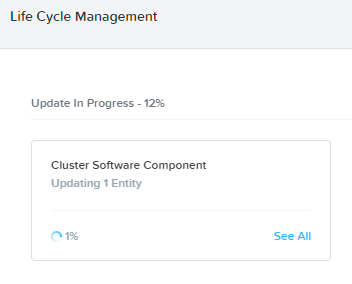
You can see that the above screenshot shows software and some hardware components that have available updates. In order to update LCM to the latest, I’ll select (and update) the ‘Cluster Software Component’ and hit the ‘Update Selected’ button.


lcm-availupdate3-sure.PNG
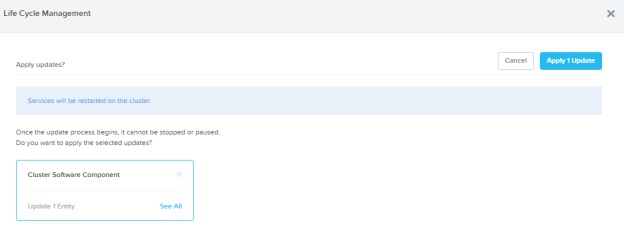
Run that update. You will see a message that “Services will be restarted” – meaning the Nutanix internal services will restart (LCM related) – but this is a non disruptive operation to your workloads so it is safe to run this update anytime. Once you hit the “Apply 1 Update” button,  update process starts.


lcm-update-in-progress.PNG

Once the new update to LCM is installed, run Perform Inventory again to see if there are any new updates or components supported in the new version (now that you’ve updated the LCM Framework, there may be some more unlocked features).

If there are any other updates available, you may choose to update them as well using the same logic.

Future Plans

In the coming months you will see more unlocked updates appear in LCM, including broader hypervisor support, more hardware component support, more Nutanix software support (eg. NCC, Foundation etc) so that the current “Upgrade Software” menu will eventually be retired and LCM takes over all functions related to our “1-Click Upgrades”.

LCM in Prism Central will also launch in 2018, with the ability to expand LCM to handle upgrades across multiple clusters.

In the meantime, the LCM Engineering team would love to hear your suggestions and feedback. They also love twitter mentions, so please keep them coming.


Nutanix Foundation 3.7

Here are some of the improvements in Nutanix Foundation 3.7 which was released on Feb 27, 2017.

Reorder of Blocks via Drag n Drop 

You can now reorder blocks so that they are in the desired positions whilst keeping the IP addressing sequence intact. This is especially useful for large deployments.

Screen Shot 2017-02-27 at 4.28.53 PM.png

Clicking ‘Reorder Blocks’ will show a drag n drop popup

A demo video illustrating the effects of reordering blocks (thanks YJ for the video):

IP Sequencing

Instead of automatic increments of IP addresses by 1, you can use a ‘+’ operand to create the sequence you desire. See below for an example.

Screen Shot 2017-02-27 at 4.33.40 PM.png

Using +2 to auto fill every 2nd IP address in the sequence

Timezone support

You can now optionally select the timezone for your cluster at the Global Configuration page.

Screenshot 2017-03-02 10.27.46.png

Timezone support

Image Selection Page Improvements

The Image Selection Page no longer forces you to upload a new images and instead use the ones already on the detected nodes.  You can also add/delete ISOs from the UI.

Screen Shot 2017-02-27 at 4.39.45 PM.png

Image Selection Page Redesigned

Updating Foundation from UI

You can now use the UI to upload a Foundation tarball and update Foundation itself when new versions are available. It is highly recommended to always use the latest version, so it is easier to update. You can get the latest release notes and Foundation files from the Nutanix Support Portal.

Screen Shot 2017-02-27 at 4.41.43 PM.png

screen-shot-2017-02-27-at-4-42-10-pm

Summary

This is a great release by the Foundation Engineering team at Nutanix with over 70 bug fixes and improvements such as the above included. There are several exciting features coming in future releases (approximately every month) so always check the Nutanix Support Portal for the latest updates. If there is a feature you’d like so see, feel free to contact me.

Nutanix 4.5 Cross-Hypervisor VM Conversion

One of the reasons people stay with a particular type of hypervisor is that it is too hard (or too costly) to migrate to another type. All that drama of converting, testing and making sure all is right and then the risk of having to move back if something went wrong.

Sure, there are separate software tools you can buy to do the conversion for you . . . but what if the virtualisation infrastructure itself – the thing that is actually providing your servers and storage – could do it as an in-built function? What if that could be done just by clicking a few buttons?

So in the demo video below, I take a running Windows VM on a Nutanix Cluster “A” running vSphere and then take a snapshot of it and send it to a second Nutanix Cluster “B” running Nutanix’s own free Hypervisor (AHV) and then start the VM. Job done. Easy.

Here’s the setup:

clustersetup

Basic lab setup using a flat L2 network. Production and DR deployments would use L3 networks – which is fine of course

..and here’s the demo:

For brevity, I cut out the initial one-off processes to set up the Replication. The full process was below (check out the Nutanix Index for articles describing setting up Replication):

1. Setup a Data Protection Remote Site ‘pair’ of clusters (so that they can replicate to each other) and test the connection.

Site A (ESXi cluster)
Site B (AHV cluster)

2. Set up a Protection Domain policy, add the VM you want to be a part of the replication policy and set a schedule.

3. On the Windows VM on ESXi on site A that you want to snap to Site B running AHV, make sure you install the Nutanix VM Mobility drivers MSI from the my.nutanix.com support portal. (These will soon be included in Nutanix Guest Tools (NGT) post Nutanix AOS 4.6 release, so by installing the NGT you will automatically get the VM Mobility drivers). The Nutanix VM Mobility installer deploys the drivers that are required at the destination AHV cluster. After you prepare the source VMs, they can be exported (snapped) to the AHV cluster.

4. Run the snapshot and restore operation as per the video. That’s it!

Word on keyboard

Almost as easy as clicking this button

A few points to note:

In the video I am just taking a crash-consistent snapshot, if you want a clean snap then shut down the source VM first, then snap, then restore. Live app-consistent snapshots will be coming in 4.6 for ESXi and AHV.

Obviously if your VMs have static IPs or to avoid computer naming issues, you should take care of these before joining the newly created AHV VM to the network. When you restore the VM on AHV, by default there is no virtual nic connected (so the risk is minimal if you just want to test). If you wanted it to connect to the network you would attach a nic to the restored VM on via Prism on the AHV cluster (go to the VM page).

Only 64-bit guest operating systems are supported at the time of writing (Nutanix AOS 4.5).

For Windows 7 and Windows 2008 R2 operating systems, you have to install SHA-2 code signing support patch before installing Nutanix VM Mobility installer. For more information, see https://technet.microsoft.com/en-us/library/security/3033929.

More info can be found in the Nutanix Prism Web Console Guide under the “Nutanix VM Mobility for Windows” section – which can be found on the Nutanix Support Portal.

Use cases:

A lot of people are trying AHV for the first time, and larger customers usually have a test/dev set of Nutanix nodes for testing. This method would be perfect to try snapping production VMs on AHV for testing and verify all is OK.

Also, I can see a use case where DR clusters could now use the in-built AHV on Nutanix clusters and save some licensing dollars.

It would also be possible to use Nutanix Community Edition as the AHV target – in case you had some spare hardware and wanted to just try this out without the need for a full Nutanix set of nodes.

Future software plans:

In a few weeks (early 2016), Nutanix will release AOS 4.6. With it, two-way VM conversion (ESXi<->AHV in either direction) should be included. In a future release AOS is expected to add support for Hyper-V, delta disks, and volume groups.

Yes, Nutanix will enable the ability to leave AHV and migrate your VMs *back* to ESXi (for example) should you choose. Put simply, the onus is on Nutanix to keep innovating to maintain your loyalty, rather than any technical or license ‘lock-in’. At the end of the day your workloads are just virtual machines – you should be free to move them wherever you see fit (even away from Nutanix if you choose).

There will be lots of improvement and extra features coming in future releases of course, which you will get by simply doing a standard Nutanix non-disruptive upgrade.

Conclusion: 

In essence, you can see why going Hyper-converged makes doing things like this almost trivial compared trying to do the same in a traditional 3-tier infrastructure (separate servers and storage layers). As the Nutanix software improves, your life gets easier each time. With each Nutanix release, more and more features like this will continue to be added and improved. Being 100% in-software is going to be a necessity in the next decade and beyond.

Thanks to @danmoz for letting me borrow his Dell XC cluster… and I treated it badly too (eg. multiple times I hard powered it off with no care – and it self-recovered every time).

shackles

Hypervisor lock-in is sooo 2007 :)